

As Valentine's Day approaches, love is in the air, and many couples are gearing up for the celebration of their special bond by tying the knot. With the joyous occasion of weddings on the horizon, there is a growing demand for the perfect way to express this love – through beautifully crafted wedding invitations and cards. In this article, we delve into the art of writing wedding invitations in bulk, offering insights and guidance for couples seeking the best means to commemorate their love during these extraordinary days. Whether you're a bride and groom-to-be or a professional in the wedding industry, join us in exploring the most effective methods for creating heartfelt and memorable wedding stationery that captures the essence of love and celebration.
Embark on a comprehensive journey into the application of the UUNA TEK iAuto Pen Plotter for typesetting and mass production of wedding invitation envelopes. It's important to note that the production technique for wedding invitation cards remains consistent; however, this tutorial specifically focuses on illustrating the process using envelopes.
Given the unique features of my envelopes, which include a flap secured by a buckle, special attention is required for writing text on this specific area. To ensure smooth batch production without the risk of jams, it is strongly advised to conduct a pre-test before initiating the process. In this tutorial, a different approach is employed from the previous one, taking into consideration the distinctive characteristics of the envelope, as depicted below:

For those instances where text on the flap is unnecessary, it is advisable to adhere to the precautions outlined in the following tutorial. This tutorial guides you through the process of purchasing an appropriate envelope and configuring the parameters accordingly. For detailed information, please refer to the tutorial available at this link: Tutorial: How to Make Bulk Greeting Cards with iAuto Auto-Feeding. This comprehensive guide will provide you with the necessary details to streamline the creation of bulk greeting cards with the iAuto Auto-Feeding feature.
Part 1 - Establish an Automated Name Replacement List
Given that wedding invitations are intended for various recipients, it's essential to implement an automatic name replacement function for efficient batch production. Start by configuring the envelope size. Open the software, access the Table function, and adjust the canvas dimensions to match the envelope size accurately. In the case mentioned earlier, where the envelope measures 22*11cm with the folded flap, set the canvas size accordingly to 22*11cm. This ensures a precise alignment for subsequent steps in the invitation creation process.

Store the names of various customers in an Excel table, as illustrated below (please note that the names provided are randomly generated using ChatGPT and are for example purposes only):

Next, utilize the Table function to add a table with one row and two columns. Adjust the number of rows and columns based on your specific requirements. Here's an example with one row and two columns:

Once the form is generated, you can input the content to be written, which may be static or subject to automatic changes. Begin by entering the fixed content:

Following the input of fixed content, proceed to enter the names you wish to quote. Select the cell where the content needs to be entered, right-click on the cell, and choose the "Bind the current cell" option. This will establish a connection between the selected cell and the corresponding data source, enabling dynamic content updates based on the names stored in your Excel table.
By binding the cell, you ensure that the content dynamically adjusts to the specific names associated with each customer, providing a personalized touch to your invitations.

Given that the names in your Excel table start from cell A1, proceed to bind cell A1. Click on the cell, select the "Bind the current cell" option, and then click "Add" to generate the binding result.
This establishes a dynamic connection between the content in your document and the data stored in the Excel table, ensuring that the names are automatically populated in the designated cells, creating personalized and customized invitations for each customer.

Following the binding of individual cells, proceed to the "Batch Application Data" function on the left. Bind the previously created table, linking the content in your document with the customer information stored in the Excel table. This step enables the efficient batch application of data, ensuring that each customer's name is dynamically incorporated into the corresponding cells in the document.
By utilizing the "Batch Application Data" function and binding the table, you streamline the process of generating personalized content for multiple invitations, saving time and ensuring accuracy.

Given that your names are arranged in rows in the Excel table, opt for the "Splitting with Rows" option. This ensures that the data is appropriately segmented, allowing the software to handle each row as a distinct set of information.
By selecting "Splitting with Rows," you enhance the precision and efficiency of the batch data application process, aligning with the row-based organization of your customer names in the Excel table.


Following the choice of "Splitting with Rows," proceed to select the Excel table that you previously prepared. This involves specifying the Excel file and table that contains the customer names and associated information.


By following these steps, the contents of the Excel table can be successfully called and integrated into the document. The dynamic linking and batch application of data facilitate the creation of personalized content for each customer, ensuring that the invitations are customized with individual names and details. This streamlined process enhances efficiency and accuracy in producing a batch of invitations with minimal effort.

In this step, you have the option to choose "Page" to preview the document with different names. This feature allows you to visually inspect how the content appears for each customer, ensuring that the personalized information is accurately reflected in the invitations. Previewing with different names provides a valuable opportunity to verify the layout and content, guaranteeing a polished and customized result for each recipient.

At this stage, the setup for batch calling different content is complete. If the cell length and width are insufficient, you can easily adjust them by dragging the mouse. Simply navigate to the designated area, and with a simple drag of the mouse, you can resize the cells to accommodate the desired content length and width. This flexibility ensures that the layout suits your specific requirements, providing a seamless and visually appealing result in the finalized invitations.

Part 2 - Creating other text content inside the envelope
Now, the remaining task involves formatting additional fixed content, such as wedding time and location details. This can be achieved by organizing the content into distinct paragraphs and specifying their precise writing positions. To seamlessly integrate the first text content into the canvas, use the characters function, which allows for precise placement and presentation within the invitation layout.


Position the cross cursor at the top-left corner of the text, click, and drag to select all the text. Afterward, choose font options to seamlessly switch between different font styles.

The layout of the envelope can be organized using the following functions:
1. Font Size:
- Adjust the text size as needed. If the current size is insufficient, you can manually enter any value to achieve the desired font size.
2. Word Spacing:
- Modify the space between letters to enhance or reduce spacing for improved visual appeal and readability.
3. Line Spacing:
- Adjust the spacing between lines to control the overall structure and aesthetics of the text.
4. Word Space:
- Fine-tune the space between words. Random gaps, generated within specified maximum and minimum values, simulate the natural randomness of handwriting.
5. Left Gap, Right Gap:
- Tailor the size of gaps between the left and right boundaries and the words. Random intervals, generated within specified maximum and minimum values, replicate the spontaneous nature of natural handwriting.
Additionally, it is advisable to maintain a 20mm space around the text to ensure optimal functionality for the writing robot. This margin allows the robot to write smoothly and without any potential interference, contributing to the overall accuracy and quality of the written content on the envelope.

In the left-hand options, every time you click "update," the software will autonomously and randomly adjust word spacing and switch fonts based on the custom font style. This dynamic feature ensures a more realistic and varied outcome, enhancing the authenticity of the final result.

Similarly, you can swiftly modify the text here, adjusting the layout with a user-friendly interface akin to Microsoft Word. This intuitive approach allows for easy and efficient customization of the envelope content.

We've incorporated random algorithms for text angle adjustments as well. If you find that the generated effect is unsatisfactory, you can experiment by reducing the automatic adjustment range. This setting allows you to fine-tune the angle, providing greater control over the overall appearance of the text.


For optimal results, it is advised to set all three parameters to the minimum values:

In Font Deformation, it is recommended to adjust the text size to 100%, avoiding any scaling for optimal results.

Following the outlined steps, you can incorporate multiple paragraphs of text for typesetting. Keep in mind to typeset based on the actual writing position of the envelope, ensuring a 20mm margin around it. Pay particular attention to the paper pressure position at the end, allowing the paper pressure wheel to effectively press the paper for normal writing.
Upon completion, the desired effect should be as follows:

Part 3 - Initiating Batch Production:
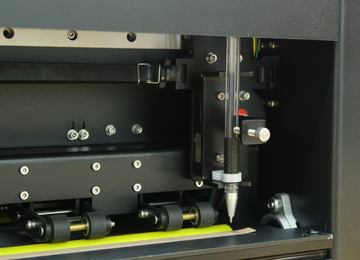
Ultimately, it's time to commence the bulk production of the envelopes. Position the envelope upside down in the paper feed slot, considering that the actual writing starts at the lower right corner of the machine. Adjust the buckle position to match the width of the envelope, ensuring proper alignment for the writing process.

Install the pen:
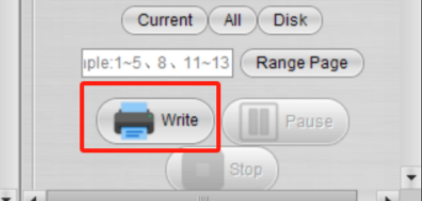
Click on "All" to generate G-code for all pages (selecting "Current" only generates G-code for the current page). Set the desired quantity to be written, typically specifying 1 copy for each envelope in the batch.

Once all preparations are complete, click the "Write" button to initiate the production process. This action triggers the writing robot to commence generating the specified number of copies for your batch of envelopes.
The outcome is as follows:

More related articles about iAuto:
- How to Automate Bulk A6 Card Writing with UUNA TEK iAuto Automatic Writing Machine
- How to Automate Bulk #10 Envelope Writing with UUNA TEK iAuto Automatic Writing Machine
- Top 10 Tips to Avoid Paper Jams with iAuto Automatic Writing Machine
- Get Thousands of Font Variaties with Font/Stroke Deformation Function
- Bulk Writing with iAuto Pen Plotter: Opening and Utilizing TXT or Word Files with Selected Fonts
- [iAuto Tutorial]Converting Text to SVG with Inkscape for iAuto Pen Plotter
- [iAuto Tutorials]How to Bulk Write Envelopes with iAuto Automatic Handwriting Machine
- [iAuto Tutorials]How to Install the software for UUNA TEK® iAuto Pen Plotter
- [iAuto Tutorials]How to Achieve Automatic Bulk Writing Using Various Fonts with iAuto Pen Plotter
- [iAuto Tutorials] How to Register and Connect to UUNA TEK® iAuto Pen Plotter
- [iAuto Tutorials]How to Make Bulk Greeting Cards with iAuto Auto Feeding Pen Plotter