
![[iAuto Tutorials]How to Make Bulk Greeting Cards with iAuto Auto Feeding Pen Plotter](http://uunatek.com/cdn/shop/articles/60.png?v=1752390505&width=1100)
How to do automatic greeting card bulk writing with UUNA TEK® iAuto Pen Plotter
Welcome to the future of greeting card writing! This tutorial will take you to explore the new UUNA TEK® iAuto Pen Plotter that automatically writes greeting cards in batches, allowing you to say goodbye to the tedious handwriting process and easily create a personalized greeting card experience. Whether you're sending unique greetings to clients or crafting special wishes for friends and family, this bot will become your indispensable creative assistant.
What’s more interesting is that iAuto Pen Plotter can copy your unique handwriting and generate font files that are exactly the same as your handwriting. This means you can retain your personal handwriting style while enjoying the convenience of automation. From now on, every greeting card exudes your unique personality. Let’s start a new chapter in writing greeting cards together!
Part 1 - Custom Handwritten Fonts
With our font customization software, we can customize our own handwriting font style.
First open the following font customization website (supports mobile phones, tablets and computers at the same time):
http://154.85.41.14

Register a free account and log in. After logging in, click the Create button to create a new font.


Then select the corresponding language type, here we choose English:

Set the font name and author and click create to generate the font file:


Select the font file just generated and click edit to copy handwriting:


Click on the first "!" square, and the input interface for the symbol or letter will pop up:
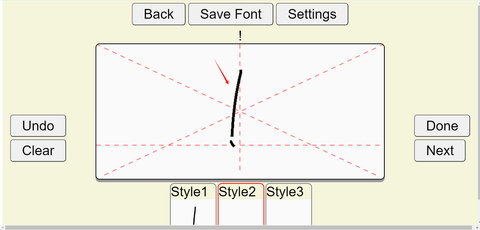
Then copy the letter in your own style. You can copy it up to three times (copying only once is OK. It is recommended to use a tablet with a stylus for better results. There are three different styles, which can be randomly switched every time the software is refreshed. This will be closer to the randomness of actual handwriting). After each copying, click the Done button to proceed to the next one. After copying three letters, you can click the Next button to copy the next letter.

After copying one by one, we will get the exclusive font file:


Of course, if you need to add specific phrases or other characters, you can click Add:

And enter the characters or words that need to be added (separate each word with spaces), such as happy new year:


Then click the search button, or click next page to find the added word, and you can enter the word or specific characters (the software will automatically call the handwriting when a specific word appears):

Finally, save it and your own personalized font will be generated:

The generated fonts can be synchronized to the local computer in the software. Open the font management function of the software:

Click cloud, log in to the font customization account created previously, and synchronize fonts in the cloud:


You can find the font you just created:


Part 2 - Create Greeting Card Content
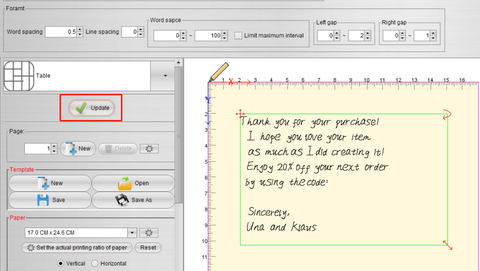
After preparing the font, we can use it to create our greeting card content. Open the software, select the Table function and set the size of the canvas according to the size of the greeting card.

Import the prepared text content into the canvas through the characters function:

Click the cross cursor in the upper left corner of the text to select all the text, and then select the customized font to switch to your own handwriting font:

We can organize the layout of greeting cards through the following functions:
Font Size: Adjust the text size. If it is not big enough, you can enter any value to adjust the size.
Word spacing: Adjust the space between letters.
Line spacing: Adjust line spacing.
Word space: Adjust the space between words. Word gaps are randomly generated between maximum and minimum values to simulate the randomness of natural handwriting.
Left gap, Right gap: Adjust the size of the gap between the left and right boundaries and the words. Likewise, the intervals are randomly generated between the maximum and minimum values to simulate the randomness of natural handwriting.
In addition, it is recommended to leave 20mm of space around the text so that the writing robot can write normally.

Remember the three font styles we customized before? Every time we click update, the software will not only automatically and randomly adjust the word intervals, but also randomly switch fonts according to the three customized font styles, making the actual effect more realistic!
Similarly, you can quickly adjust the text here, and adjust the layout just like Microsoft Word:

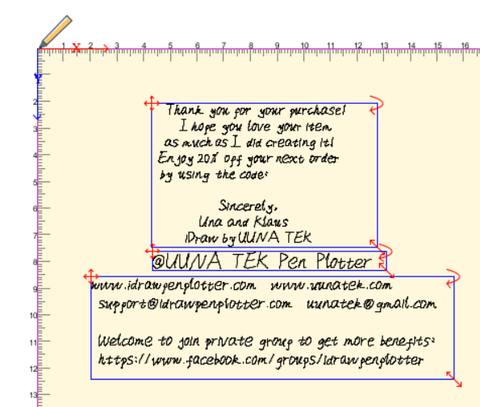
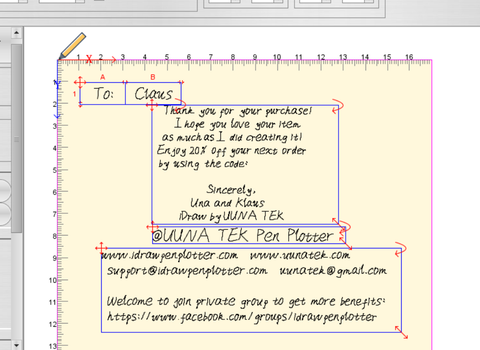
At this point, the basic typesetting is completed, as follows:
We also have some random algorithms for text angle adjustment. If you feel that the generated effect is not good, you can try to reduce the automatic adjustment range. It can be set here:


It is recommended to adjust all three parameters to the minimum:

Part 3 - Bulk Writing Settings
So how to set up batch custom writing content? Suppose I want to write greeting cards to different customers, then I can first save the names of different customers in an excel table, as shown below:

Then add a table through the Table function:

After the form is generated, you can enter the content to be written in it, which can be fixed or automatically changed. I first enter the fixed content:

Then enter what needs to be called. Click to select the cell where content needs to be entered, right-click and select the bind the current cell option:

Because our name starts from A1, we bind cell A1 and click add to generate the binding result:

Then select the Bath application data function on the left and bind the table we made before.

Because our names are arranged in rows, choose splitting with rows:


Next, select the previously prepared excel table:


In this way, the contents of the table can be successfully called:

You can click Page to preview different values:

At this point, how to batch call different content is set up.
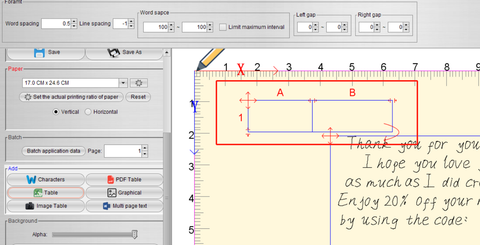
If the cell length and width are not enough, we can also adjust the length and width by dragging the mouse here:

The final layout is as follows:
Of course, you can also save the greeting card content as a template and open it directly later to continue using it (note that you need to rebind the excel table when opening the template):

Part 4 - Start Bulk Writing
Finally, it’s time to batch make greeting cards. We start the software and when using it for the first time, we need to add and register the machine. After connecting the machine and computer using USB, select to search for the local machine (if it cannot be found, try re-plugging and unplugging the USB):

After the search is successful, the machine will be automatically connected, and a registration window will pop up (the machine cannot be used without registration):

The registration code is required when registering, which is usually pasted on the machine body.
After registering and logging in, click All to generate the gcode file that needs to be written (click Current to only generate gcode for the current page):

Place the greeting card upside down in the paper feed slot (the actual writing starting point is at the lower right corner of the machine), and adjust the buckle position so that it is the same width as the greeting card:

Install the pen:

When everything is ready, you can click the Write button to start production:

The effect is as follows:

More related articles about iAuto:
- How to Automate Bulk A6 Card Writing with UUNA TEK iAuto Automatic Writing Machine
- How to Automate Bulk #10 Envelope Writing with UUNA TEK iAuto Automatic Writing Machine
- Top 10 Tips to Avoid Paper Jams with iAuto Automatic Writing Machine
- Get Thousands of Font Variaties with Font/Stroke Deformation Function
- Bulk Writing with iAuto Pen Plotter: Opening and Utilizing TXT or Word Files with Selected Fonts
- [iAuto Tutorial]Converting Text to SVG with Inkscape for iAuto Pen Plotter
- [iAuto Tutorial]Auto Wedding Invitation Production: A Guide with iAuto for Valentine's Day
- [iAuto Tutorials]How to Bulk Write Envelopes with iAuto Automatic Handwriting Machine
- [iAuto Tutorials]How to Install the software for UUNA TEK® iAuto Pen Plotter
- [iAuto Tutorials]How to Achieve Automatic Bulk Writing Using Various Fonts with iAuto Pen Plotter
- [iAuto Tutorials] How to Register and Connect to UUNA TEK® iAuto Pen Plotter