Halloween is the perfect time to unleash your creativity and add a personal touch to your cards and invitations. With the iDraw HSE Pen Plotter, you can elevate your designs by creating intricate and unique Halloween-themed artwork. Whether it's spooky characters, eerie landscapes, or custom text effects, this guide will walk you through the steps to design and plot your personalized Halloween cards and invitations. We'll cover everything from preparing your materials to using powerful AI tools and vector drawing software to make your designs truly stand out.
Table of Content:
Part 1)Preparation - Software and Hardware
Part 2)Design Halloween Cards and Invitations
Part 3)Start Writing and Drawing with iDraw H SE Pen Plotters
Summary
Part 1)Preparation - Software and Hardware
1. Prepare Halloween sticker materials (SVG files)
You can use vector drawing software to design Halloween-style sticker materials yourself, or download some free resources on the Internet. It is recommended to use free commercial SVG file resource websites, such as Freepik. Please note that when using free resources, please indicate the author's source as required, or choose a paid version to avoid copyright issues.
2. Use AI tools to generate patterns
If you choose to design your own patterns, you can use AI generation tools, such as Midjourney, Stable Diffusion, Adobe Firefly, etc., to generate pictures that match the Halloween theme, and then use vector software such as Inkscape or Adobe Illustrator to convert them into SVG files.
3. Download the control software of iDraw H SE Pen Plotters here: UUNA TEK Downloads - Software, Tutorials, and Updates! and Make sure you already have the machine of iDraw H SE Pen Plotters here.
Part 2)Design Halloween Cards and Invitations
1. Generate unique Halloween-style pictures through software such as ChatGPT or Stable Diffusion, such as the beetlejuice style I generated here:

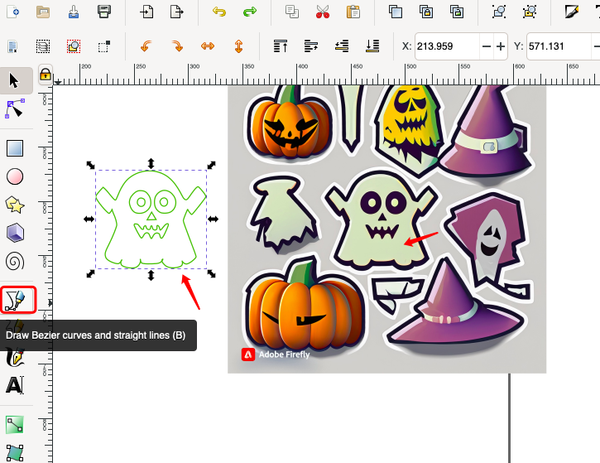
2. Import the generated image into vector drawing software (such as Inkscape) to create an SVG line file. For simple patterns, you can directly use the pen tool (draw bezier curves and straight lines) to trace the path along the outline of the pattern (which will be introduced later), as shown below:

Since my pattern is quite complex, I use the Trace Bitmap function under Path to automatically convert the path (usually the default parameters are sufficient):

Note that the generated svg path overlaps with the original image. We can use the mouse to drag them apart:

For easier viewing, we can adjust the display mode and change it to outline mode to see the final effect (in order to decide whether to fine-tune the trace bitmap parameters):

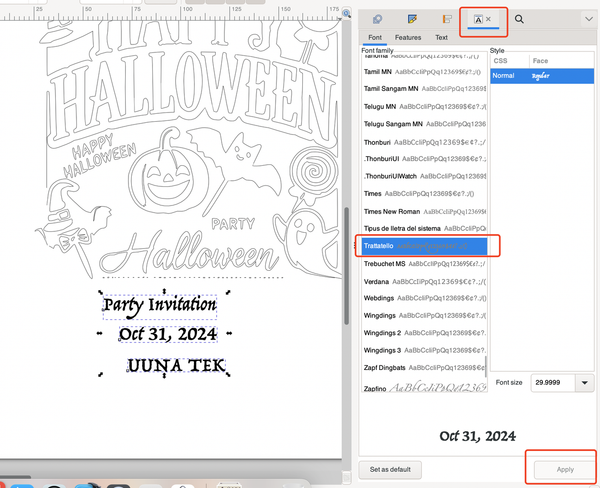
3. Using the same method, we can generate a suitable text effect and create the path with the pen tool:

4. Now you can get a personalized Halloween invitation material:


6. Finally, generate the filled path of the text (because the current text only has outline lines, if you want to draw the path inside the text or other closed graphics, you need to generate an automatic path for filling). Select the Hatch Fill function under iDraw Utilities:


Since the thickness of the brush determines the size of our hatch spacing, we first simulate the actual brush thickness on Inkscape according to the corresponding pen thickness, so that we can basically see the final effect of the painting, and confirm whether the pattern needs to be enlarged or reduced and rearranged according to the pen thickness to get the appropriate effect.


After doing this, back to the Hatch Fill function, I set the fill spacing to be slightly smaller than the brush size (0.8mm) so that the text can be completely filled with overlapping parts (of course, you can also set it slightly larger to simulate the effect of striped fonts, such as 1.5mm, you can try it yourself):


Part 3)Start Drawing with iDraw H SE Pen Plotters
1. Before painting, we need to put the paths of the same color into the same layer, so that we can use the same pen to paint the same color and finish it at one time. We have two pens here, black and orange. First select all the orange paths (you can drag and select or hold down shift and click with the mouse to make multiple selections), and select Group by right-clicking the mouse to combine them into a new group, which is convenient for the subsequent layering process:

2. Create two new layers, black and orange, and assign the corresponding patterns to the two layers (move to layer, other redundant images, text and other layers can be deleted later):

When you select the black path, the corresponding black layer will light up, indicating that the assignment is successful:

3. Finally, you can start painting. When you want to draw a black path, click the small eye in front of the orange layer to hide the orange outline first:

Then you can draw the black part through iDraw HSE Control:

After finishing the drawing, switch to the orange pen (make sure to keep the machine's origin consistent), hide the black layer, open the orange layer, and then draw the outer contour, as follows:

The final effect is as follows:

Summary:
In this tutorial, we've explored how to personalize Halloween cards and invitations using the iDraw HSE Pen Plotter. By combining AI-generated designs and vector software, we created detailed Halloween-themed images and text effects. We demonstrated how to convert these designs into SVG line files, adjust paths for precision, and use the Hatch Fill function to perfect your drawings. With simple layering techniques and a few careful adjustments, you can bring your spooky creations to life. Now you're ready to produce impressive, customized Halloween invites that will captivate your guests!

