

If you're looking to automate personalized handwriting on cards, letters, or invitations with your iDraw HSE Pen Plotter, the HSE Merge Extension is your best tool. This powerful plugin allows you to merge data from spreadsheets and automatically generate handwritten content for each recipient—saving you countless hours and ensuring professional, consistent results.
In this comprehensive guide, you'll learn how to set up the iDraw HSE Merge Extension in Inkscape, create templates, import data, and start bulk writing with your iDraw HSE machine. Whether you're a small business, event planner, or stationery creator, this step-by-step tutorial is your key to unlocking efficient, automated handwriting production.
What is the iDraw HSE Merge Extension?
The HSE Merge Extension is a plugin designed for Inkscape users who operate iDraw HSE Pen Plotters. It enables you to perform mail merge operations by pulling personalized data—such as names, addresses, or custom messages—from a .CSV spreadsheet and placing it into your design template. This makes it ideal for:
- Handwriting personalized cards
- Writing bulk invitations
- Producing thank-you notes with names and addresses
- Automating envelope addressing
- Any project requiring unique handwritten text for each item
Tools You Need to Get Started
Before diving into the process, ensure you have the following:
- Downloaded HSE Merge Extension for Inkscape
- A prepared Template File in Inkscape (SVG format recommended)
- A Data File in .CSV format containing your personalized text
- Your iDraw HSE Pen Plotter, properly set up and ready to use
Step-by-Step Tutorial: How to Use HSE Merge for Automated Handwriting
Step 1: Install the HSE Merge Extension in Inkscape

1. Download the HSE Merge Extension package.
2. Extract the downloaded files.
3. Copy all extracted files into the Inkscape Extensions directory.
4. Restart Inkscape.
Tip: To confirm successful installation, go to the Extensions menu in Inkscape. You should see iDraw HSE Merge listed among your available plugins. Check how to install the extension for inkscape here.

Step 2: Prepare Your Data File (.CSV Format)

The data file is the backbone of your automated handwriting project. Here's how to structure it:
- First Column (ID): Keep this as-is; it's essential for row identification.
- Second Column (name): The recipient's name.
- Third Column (address): Their address, or any other personalized content.
You can customize these columns with additional fields as needed. Within your Inkscape template, use placeholders like {{name}} or {{address}} to automatically insert the relevant information during the writing process. In this example, {{name}} means Sarah Johnson, and {{name++1}} means Michael Green. Similarly, you can understand the meaning of {{adress}} and {{adress++1}}

Important: For long text fields (e.g., multi-line addresses), insert line breaks by pressing Alt + Enter within your .CSV file.
Step 3: Create Your Handwriting Template in Inkscape
1. Measure your card or paper size. For example: Individual Card Size: 113mm (width) x 163mm (height)


2. Writing on 3 Cards in a Row: 113mm x 3 = 339mm total width

3. Set up your Inkscape document with the correct dimensions to match your material layout.
4. Use Inkscape's grid or guidelines to visually mark each card boundary, ensuring your text is perfectly aligned and avoids overlapping or misplacement.

5. Insert Text Placeholders:
{{name}} → Will be replaced with each person's name from your .CSV
{{address}} → Will insert the corresponding address

Example Settings for Text Positioning:
Name Field:
- Font Size: 20
- X Offset: 30mm (distance from left edge of card)
- Y Offset: 30mm (distance from top ed

Address Field:
- Font Size: 16
- X Offset: 14mm
- Y Offset: 117mm
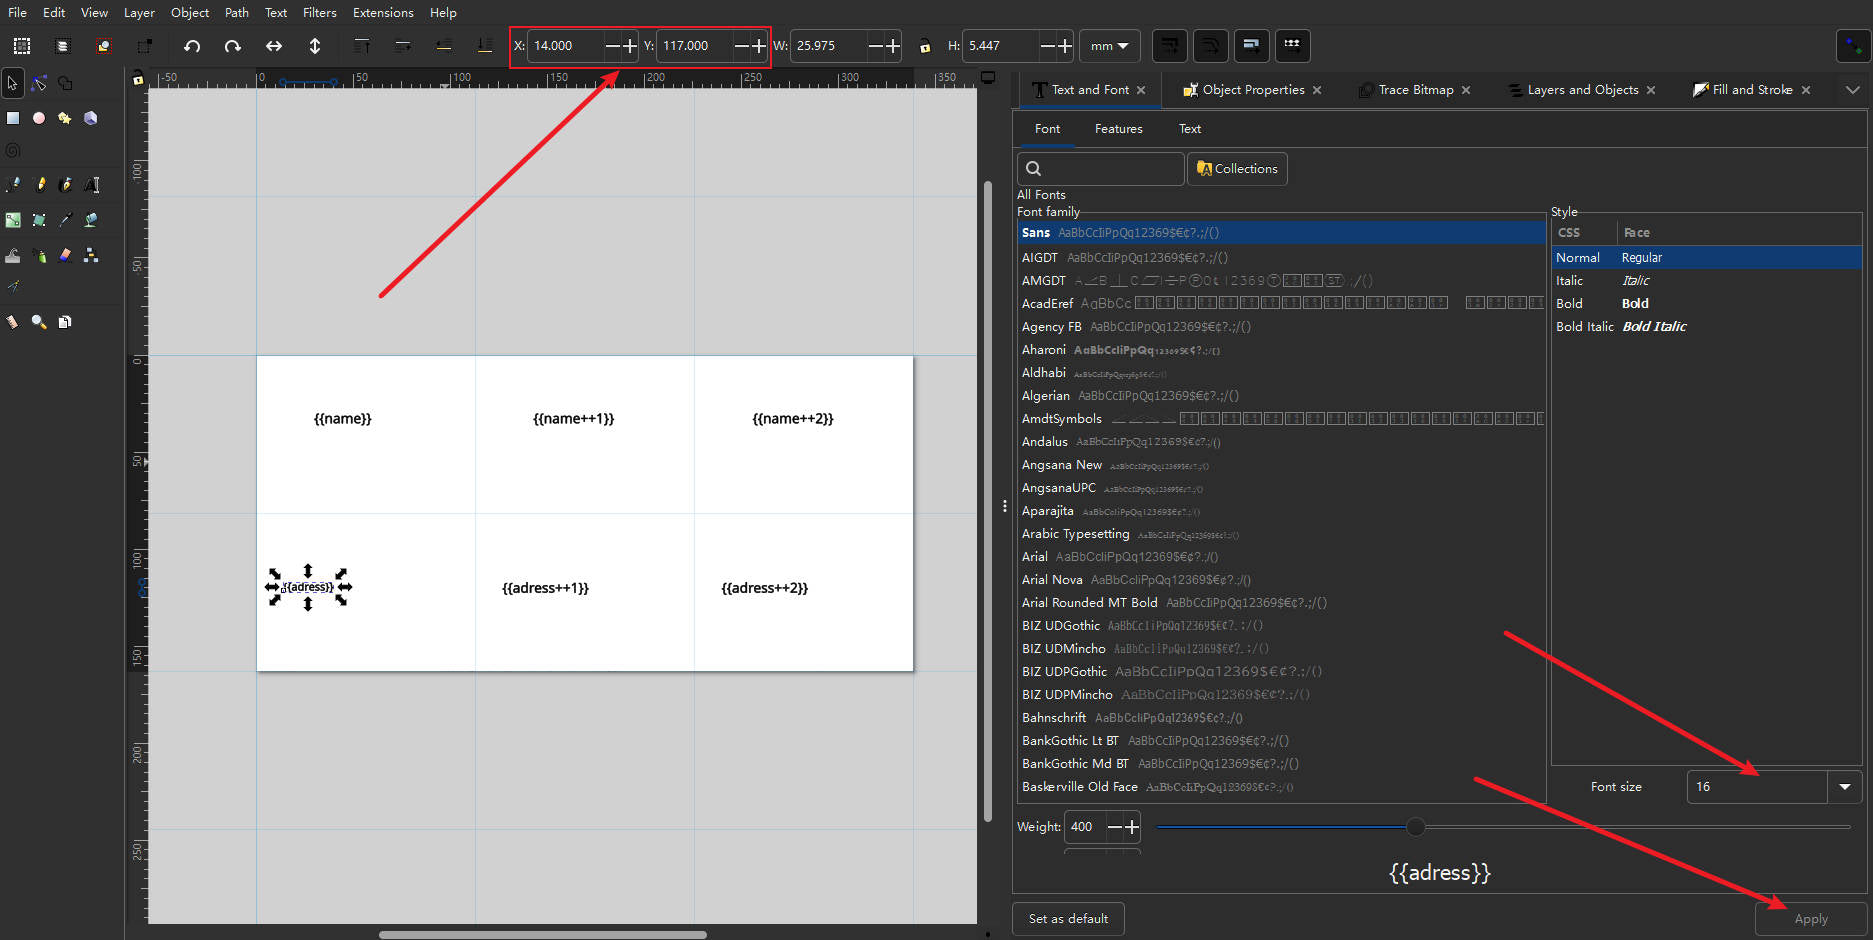
These values ensure precise placement on your card or stationery. There is one more thing that needs to be adjusted. Because our address is very long, we need to write the address in two lines. Just divide the address into two lines in the data file, and press Alt+Enter at the position where the line needs to be divided, as shown in the figure

Step 4: Connect Your iDraw HSE Machine
1. Place the cards or paper onto your iDraw HSE Pen Plotter.

2. Install your pen securely into the machine.
3. Connect the machine to your computer.
Step 5: Run the HSE Merge Extension for Bulk Writing
1. Open the HSE Merge Extension within Inkscape.
2. In the Data section, select your .CSV data file.

3. Choose the Row Range you want to process:
Example: Write rows 1 to 3 for three cards.

4. In the Text tab, select your preferred font style.

5. Under the Auto tab, click "Apply" to start writing.

The machine will begin handwriting each card based on your data file and template setup.

Step 6: Writing Specific Rows for On-Demand Personalization

You can also use HSE Merge to write specific rows individually:

Suppose you want to write only the fourth recipient's details:
- Set Row Start = 5, Row End = 5.
After writing, replace the card with a new one.
Change the row number to 5, 6, etc., for each subsequent piece.
This method is ideal for small-batch personalization or when manually changing paper between writes.
Example Output:
For Row 5, with the following data:
| ID | name | address |
|---|---|---|
| 5 | Jessica Lee | 888 Redwood Circle, Apartment 2B, Sunnyvale, AZ |
The machine will write:

After completion, the pen automatically returns to the home position, ready for the next operation.
Final Thoughts: Why Use HSE Merge for iDraw HSE Pen Plotters?
The HSE Merge Extension dramatically simplifies the process of creating personalized, handwritten content with:
✔️ Fully automated bulk handwriting
✔️ Precise positioning and layout customization
✔️ Easy data import via .CSV files
✔️ High-efficiency output for cards, envelopes, or labels
✔️ Ideal for weddings, marketing, events, and business stationery
By mastering this extension, you unlock the full potential of your iDraw HSE Pen Plotter—making personalized handwriting scalable, professional, and incredibly efficient.