In this comprehensive DIY guide, we'll take you through the creative process of designing unique A6 Save The Date Wedding Cards using A4 papers and the innovative iDraw Pen Plotter. From generating theme materials to crafting SVG files with Inkscape and adding captivating text content, each step is tailored to help you create personalized masterpieces. The iDraw Pen Plotter becomes your artistic ally, allowing for seamless transitions between different colored pens as you bring your vision to life. Celebrate the fusion of creativity and technology, and craft Save The Date cards that reflect the individuality of your special day.
Step 1: Theme Material Generation
To kick off your DIY project, consider incorporating wedding-related decorations to give your Save The Date card a unique touch. One approach is to use ChatGPT to generate inspiring ideas for your theme materials. Alternatively, if you prefer a hands-on approach, you can unleash your creativity using vector software like Adobe Illustrator to craft these materials yourself.
Whether you choose to harness the power of AI-generated concepts or prefer a more manual design process, the goal is to infuse your Save The Date card with elements that reflect the essence of your special day. Let's dive into the creative process and make your Save The Date card truly one-of-a-kind!

Step 2: Crafting SVG Files with Inkscape
Now, let's bring your Save The Date card to life by designing its content and converting it into an SVG file suitable for the iDraw Pen Plotter.
-
Material Integration: Begin by importing the theme materials generated earlier into Inkscape. Navigate to the "Import" function under the "File" menu to seamlessly incorporate these elements into your design canvas.
Pro Tip: Take advantage of Inkscape's versatile tools to arrange and customize the imported materials, ensuring they harmonize seamlessly with your envisioned Save The Date card.

-
Then go to the trace bit map function:

-
Set the parameters, usually the default is enough, and then click Apply to convert the image into an SVG file (contour lines):


-
Double-click the generated outline to edit the path, and you can choose to delete the parts you don't need and keep only the things you need:


Step 3: Adding Text Content with Unique Effects
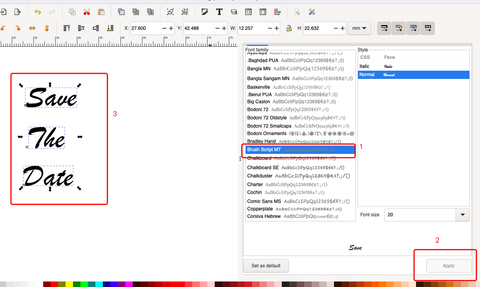
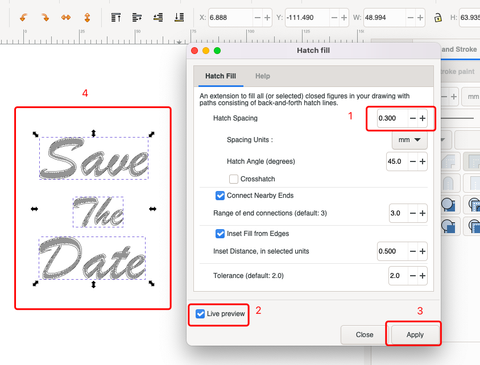
As we approach the final touches of your DIY Save The Date card, let's delve into incorporating captivating text content. Elevate your design with distinct copywriting that can be transformed into various text effects, be it a sleek single line or a stylish filled outline.
Creating a Single Line Effect using Hershey Text:
-
Text Entry: Begin by entering your desired text onto the canvas.
-
Selection: Highlight the text you've just entered.
-
Hershey Text Option: Open the Hershey Text function to unlock a range of possibilities for your text effects.
Pro Tip: Experiment with different fonts, sizes, and styles within the Hershey Text option to achieve the desired single line effect for your text.


Step 4: Bringing Your Design to Life with iDraw Pen Plotter
The grand finale is here! Let's use the iDraw Pen Plotter to bring your meticulously crafted Save The Date card to life. Given that we're using pens of different colors, we'll leverage the layering functionality to achieve distinct drawings.
-
Color Segmentation: Separate your materials based on colors to streamline the drawing process. Identify different elements that will be drawn with pens of specific hues.
-
Layer Organization: With precision, select each corresponding material, right-click, and utilize the "Move to Layer" function. This step ensures that materials of different colors find their designated layers.
Pro Tip: Organizing your layers diligently makes the drawing process smoother, allowing the iDraw Pen Plotter to execute each color with finesse.


Step 5: Sequential Drawing with Different Colored Pens
The grandeur of your Save The Date card unfolds as we move from one color to another. After completing the drawing with the black pen, seamlessly transition to the red pen to continue the artistic journey.
-
Black Pen Drawing: Begin by executing the drawing process with the black pen, following the layers and design you meticulously organized.
-
Pen Switching: Once the black pen work is complete, smoothly transition to the red pen. Ensure precision in aligning with the existing design, maintaining the cohesive flow.
Pro Tip: Take your time during the pen switch to guarantee a seamless continuation of your artwork.
-
Final Effect: The result is a visually stunning Save The Date card with a harmonious blend of colors, each pen adding its unique touch to the overall design.


Summary: Crafting Your Unique Save The Date Card with iDraw Pen Plotter
Embark on a creative journey with our DIY guide, where we explore the art of crafting A6 Save The Date wedding cards using A4 papers and the iDraw Pen Plotter. From generating theme materials to organizing layers, each step is detailed to help you create personalized masterpieces. The guide celebrates the marriage of creativity and technology, ensuring your Save The Date cards stand out with vibrant colors and unique designs. Craft an unforgettable experience for your recipients with this step-by-step tutorial, tailored to make your special day even more memorable.

